
Adlard Print's design studio can design your newsletter to your specification, A4 or A5, b/w or colour, in any page range to make your content stand out. If you are thinking of doing your own design, send it in and we will check it over before printing. If you need advice in setting up your own artwork, get in touch and we will happily advise you.
Artwork should be supplied as CMYK with bleed and crop marks included where required.
We accept most file types although high resolution PDF is preferred, which must be supplied on a USB memory stick or via email. WeTransfer must be used if files are over 15MB
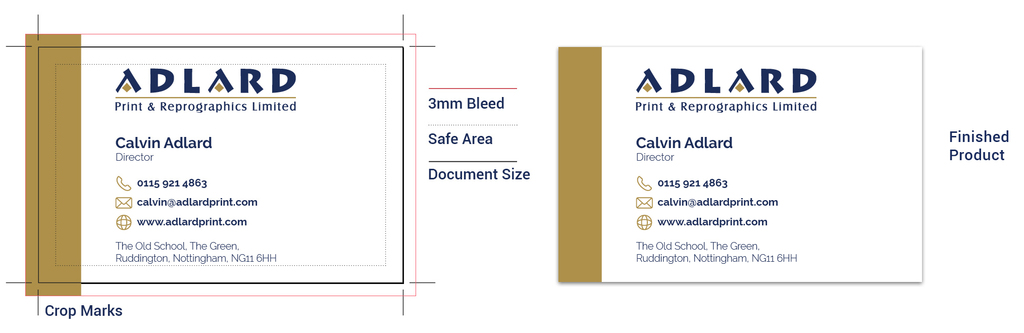
What is Bleed?
Ink that prints beyond the trim edge of the page to ensure it extends to the edge of the page after trimming. As there is a degree of movement when printing on any press, you should always create 3mm bleed on all edges where bleed is needed. Supplying your job without bleed may result in white lines when we trim it.
How to apply Bleed
The concept of applying bleed is the same for all desktop publishing programmes. You need to extend the object box, whether picture or colour, out past the edge of your page. Then, when creating the PDF, you need to set your bleed margins to 3mm.
With Microsoft Word, PowerPoint or Adobe Photoshop you do not have the ability to add bleed when creating a PDF. You need to make your page/image size 6mm bigger at the start. You will then treat the extra 6mm (3mm all round) as bleed, which will be removed when we trim your job. For example, A4 is 210mm x 297mm. Your page with bleed will be 216mm x 303mm.
Safe areas
There is always a small degree of movement when printing and finishing a job, it is recommended that your artwork is at least 5mm from the edge of the page if it is not meant to bleed off. This is known as the ‘safe area’
Borders
Printed borders placed too close to the edge of a page may look uneven when the job is trimmed.
We offer a much larger range of options than those displayed on our website, please give us a call or click the email link above to discuss your requirements.